New Features
STB & Manual Mode
Manual mode allows users to manually access any channel or service on the Encoder (whose Input type is Set Top Box). It also enables users to do media recording (scheduled recording) by issuing channel change commands to STBs and recording the content.
Enabling Manual Mode
Encoder input type must be for STB
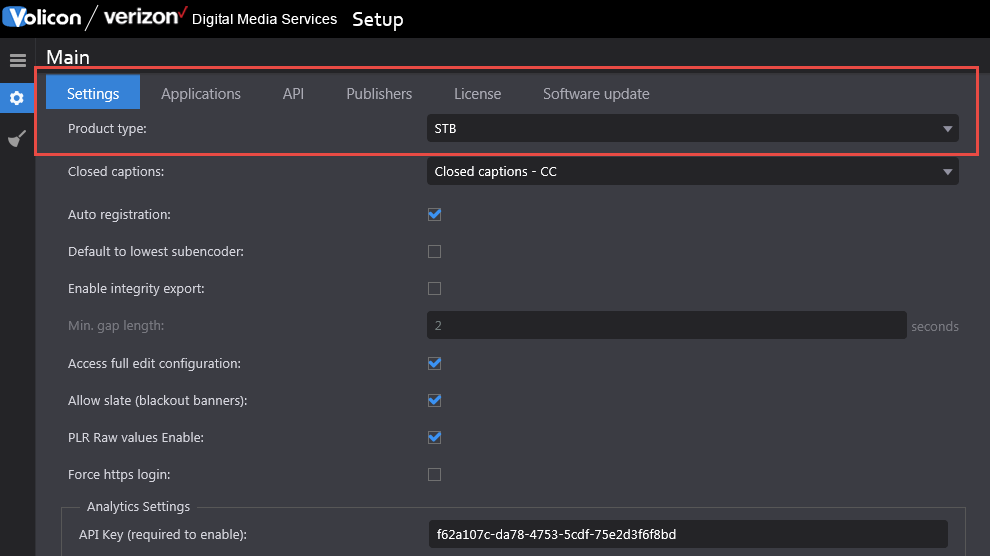
On Volicon Setup page, Product Type needs to be set to STB instead of STD
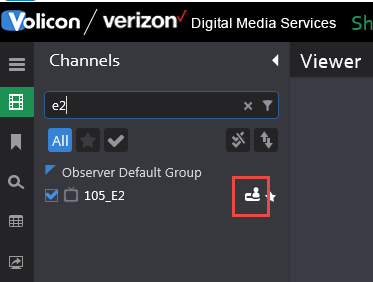
To enter Manual mode, go to Viewer page and click on “Remote control available” button
Exiting Manual Mode
Close the player by unchecking the channel from the channel dashboard.
Explicitly click on the STB Icon in front of channel name.
Using Manual mode
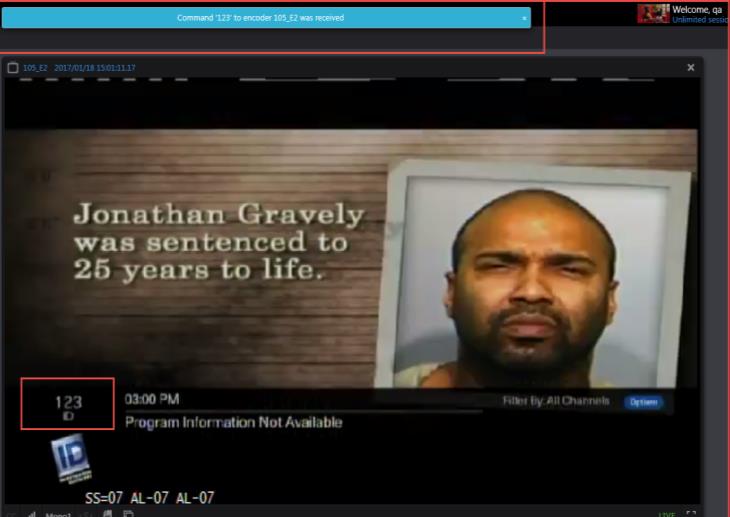
When user enters manual mode, a message is displayed that an “open” command has been issued.

The icon (highlighted in red) changes to indicate the user who is now controlling the STB.
Player connects to LIVE port and starts playing Live. All player controls such as mark-in, mark-out, forward, rewind, calendar etc. are disabled except for volume buttons and change hour span.
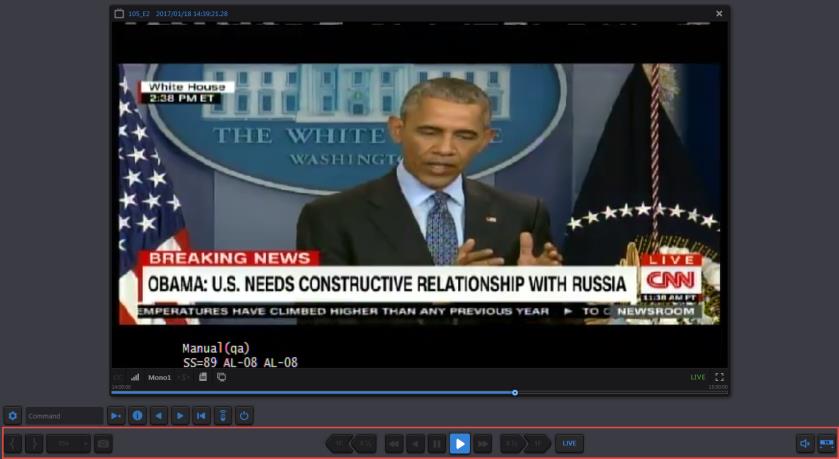
In addition, a remote control bar opens to control STB.

1 – Services – Connect directly using Service name
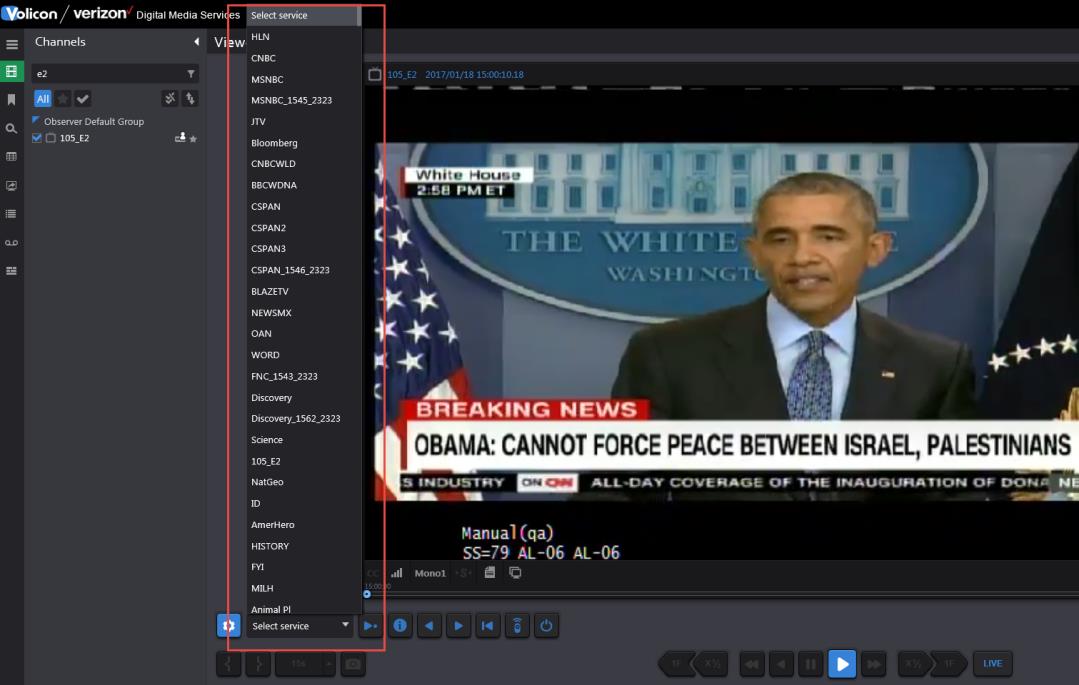
2 – Command – Text box where user can enter different commands to be issued to STB such as Channel number or guide (similar to commands on remote)
3 – Enter – Execute the command mentioned in Text box
4 – Info – Command STB to display information about the program currently running
5 – Previous Channel – Connect to previous channel
6 – Next channel – Connect to next channel
7 – Last Channel – Returns STB to last channel tuned to. For example, if tuned to channel 100 and then tuned to channel 123, clicking “Last” would return STB to channel 100.
8– Remote Control- Brings up a graphic remote control (if programmed for the type of STB used)
9– Power On/Off - Command brings STB in/out of standby mode
Rules for Manual Mode
Different states of Remote Control-
 – Remote Control Available
 –User is controlling the STB and hence remote control is not available (hover above icon to display name of user accessing STB)
 - Scheduler is controlling it, which means Schedule recording is on (hence user will not be able to access manual mode for that encoder)
Definition of Key Terms
TERM |
DEFINITION |
Encoder/Stream |
Encoder receives and processes media signals from STB. |
Service/Channel |
Network’s media service content as perceived by the end user. Typically a cable , broadcast channel or specialty service |
Bouquet |
A mapping of channel numbers to virtual channel numbers to allow for use by STB in creating things such as scheduled record or manual mode channel changing |
Configuring STB Information
The following steps need to be followed in order for STB and Schedule recording to work properly:
Define Scripts – Used by Schedule recording module to define what should happen before and after the recording of a particular service/channel finishes.
Define Services – Contains all the content provider’s services that need to be available for the encoders/probes throughout the system.
Define Bouquets – Associate services with their dial numbers (channel numbers) for specific providers and geographical locations. Multiple bouquets are defined according to the STB Type, location, provider etc.
Define STB – Associate remote image with IR file (created by IR Trainer) and the corresponding PHP file.
Scripts
Scripts are used to execute commands on Services, like during a Schedule recording.
Defining Scripts
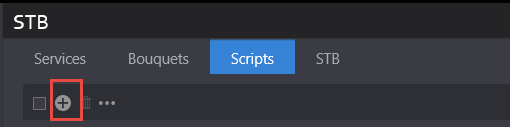
Go to Settings -> STB -> Scripts tab
Click on + button to add a new script.
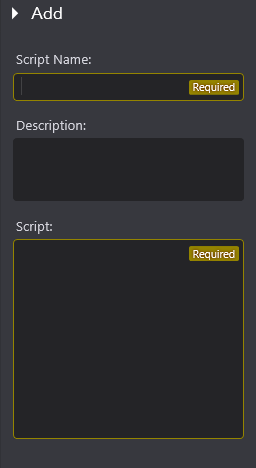
Complete the following script parameters:
Name – A meaningful name describing the script and its intent
Description – Script description
Script – Command to execute
Editing Scripts
Go to Settings -> STB -> Scripts tab
Hover mouse on the record to be edited and click on Edit button

Save changes or Cancel them
Deleting Scripts
Go to Settings -> STB -> Scripts tab
Hover mouse on the record to be deleted and click on Delete button

Dialog box will appear for user’s confirmation
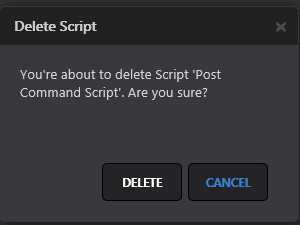
Click on Delete button on dialog box to delete the script or cancel button to cancel deletion
Records can also be deleted by selecting several records and clicking the Delete All button
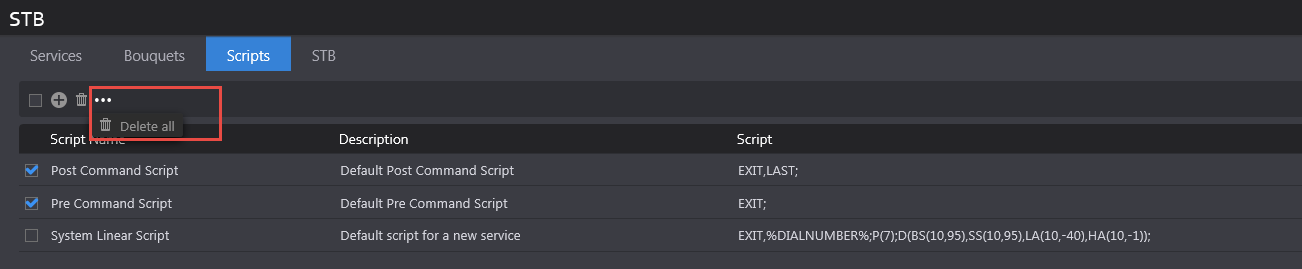
Dialog box will appear for user’s confirmation
Click Delete button on dialog box to delete the scripts or cancel button to cancel deletions
Filtering Scripts
Go to Settings -> STB -> Scripts tab
At Search panel on the left side of the page, enter text that you want to search
Search will be performed on the Script Name field
Click on Reset button to clear the search results and restore all records on the page.
Services
A pool of services is defined on the CS to access channel programs through scripts, manual mode and schedules.
The broadcast types on different channels are:
Linear
On-demand
Interactive TV Services such as Arts & Entertainment, VOD Play Out, IMG Check , etc.
Defining Services
Go to Settings -> STB -> Services tab
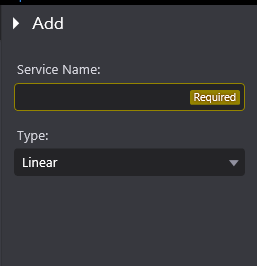
Click on + button to add a new Service.

Enter a meaningful name for the service and click save
Editing Services
Go to Settings -> STB -> Services tab
Hover mouse on the record to be edited and click on Edit button

Save changes or cancel them
Deleting Services
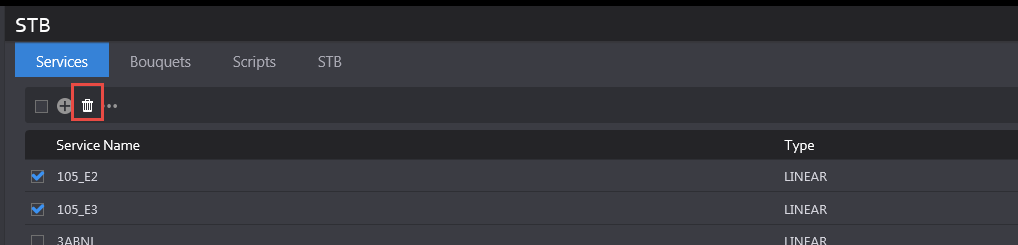
Go to Settings -> STB -> Services tab
Hover mouse on the record to be deleted and click on Delete button

Dialog box will appear for user’s confirmation
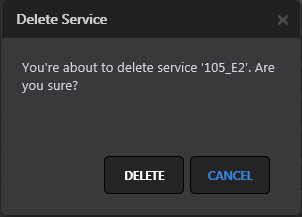
Click Delete button on dialog box to delete the service or cancel button to cancel deletion
Records can also be deleted by selecting several records and clicking the Delete All button
To delete all services from all pages, use Delete All option as shown below:
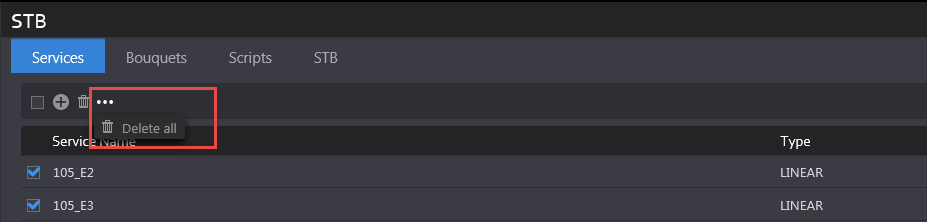
Dialog box will appear for user’s confirmation
Click on Delete button on dialog box to delete the scripts or cancel button to cancel deletion
Filtering Services
Go to Settings -> STB -> Services tab
At Search panel on the left side of the page, enter text that you want to search
Search will be performed on the Service Name field
Click on Reset button to clear the search results and restore all records on the page.
Bouquets
A bouquet may be used with one or more encoders
Different bouquets may have different associations
A&E, 327 (in NYC)
A&E, 528 (in NJ)
Adding a New Bouquet
Go to Settings -> STB -> Bouquets tab
Click on + button to add a new bouquet.
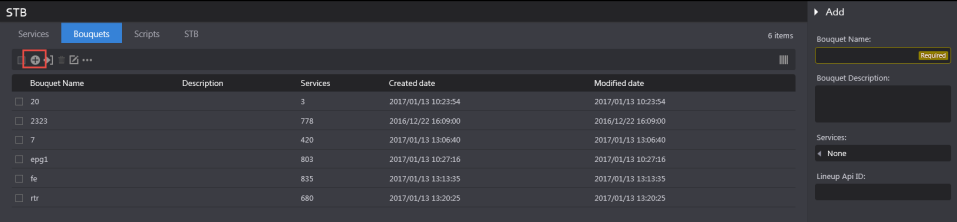
Enter a meaningful name for the bouquet and a description
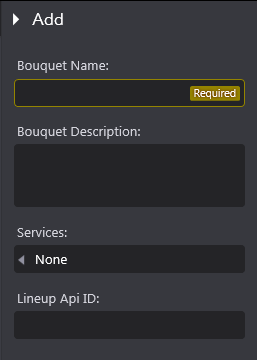
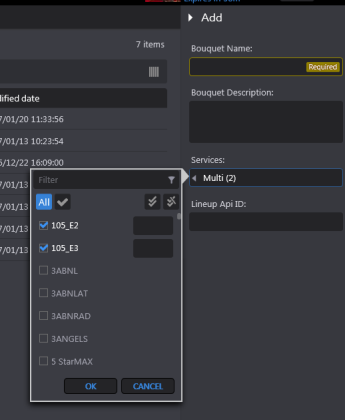
Click on Services textbox to add services to the bouquet. This field will be disabled if no services exist on Services tab. If there are existing services, user can search the service name, enter a dial number in the textbox next to Service name and click on Ok Button.
If a user creates a new bouquet with an already existing name, an error message is displayed to the user that the same name cannot be used.
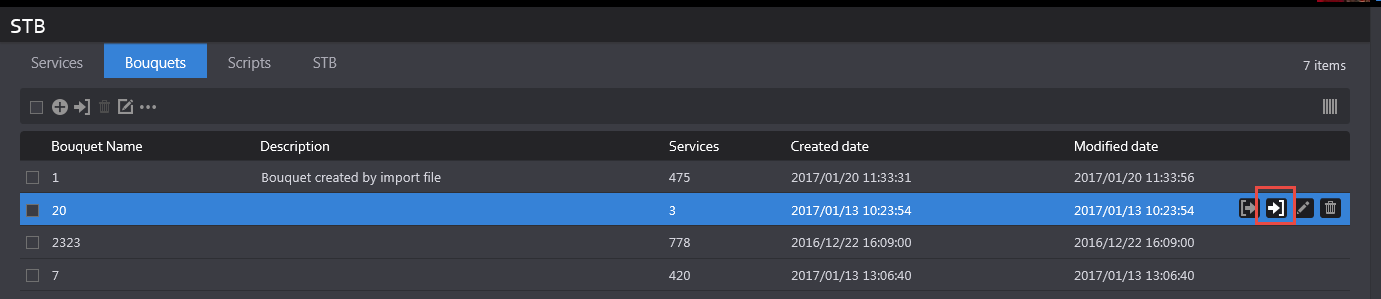
Importing a Bouquet
A bouquet can be imported from a CSV File. The format of the file is as follows (first column is Service name and second column is Dial number):
5 StarMAX |
338 |
A&E Network |
37 |
A&E Network HD East |
837 |
ActionMAX |
343 |
Go to Settings -> STB -> Bouquets tab
Hover mouse over an existing bouquet entry.
Click on Import Services button
On the dialog box, click on Select File button to select a CSV file from your folder structure.
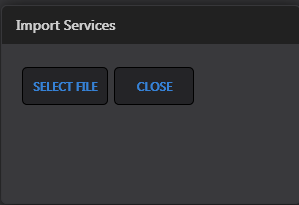
User gets a confirmation message that “Services are imported successfully”

Notice that the description is set to “Bouquet created by import file” by default and the services number column is updated based on the number of services mentioned in the CSV file.
Rules for Importing Bouquet
Services not existing in a bouquet will be added to it
Services missing in the imported file but defined in the Bouquet will be left in the Bouquet.
Editing Bouquets
Bouquet can be edited one at a time however, some functions can be performed on all bouquets simultaneously such as Add Service, Change service dial number or Delete service.
Add Service
Click on “Add service” option from the menu.
On the “Add Service” dialog box, click on the Service name arrow and select the service that needs to be added to all bouquets.
Mention the Dial number and click on Save.
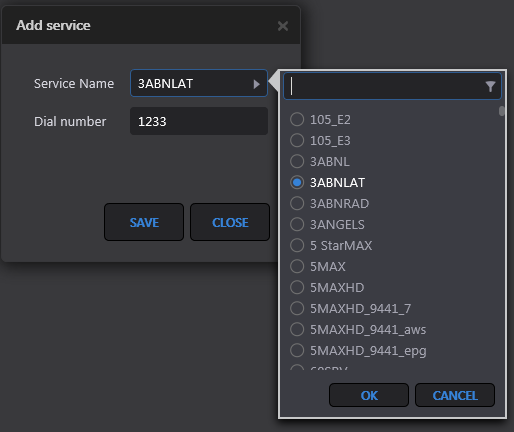
A confirmation message appears to the user when operation finishes.

Change service dial number
This function allows users to change dial number for a service in all the bouquets.
Click on “Change service dial number” option from the menu and on the dialog box.
Click on the Service name arrow and select the service for which dial number needs to be changed.
Mention the new dial number in Dial number field.
Click on Save.
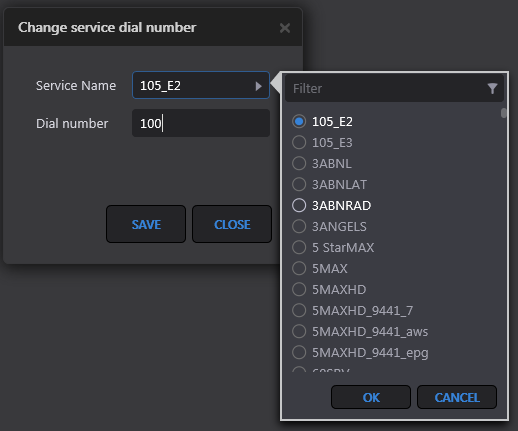
A confirmation message appears to the user when operation finishes.

Delete Service
This function allows users to delete a service from all the bouquets
Click on “Delete service” option from the menu and on the dialog box
Click on the Service name arrow and select the service that needs to be deleted.
Click on Delete button.
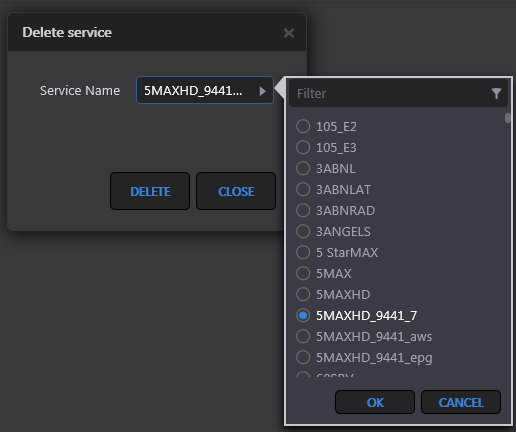
A confirmation message appears to the user when operation finishes.

Deleting Bouquets
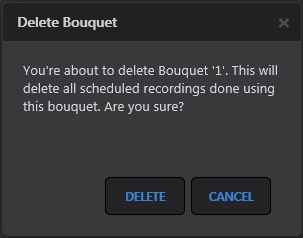
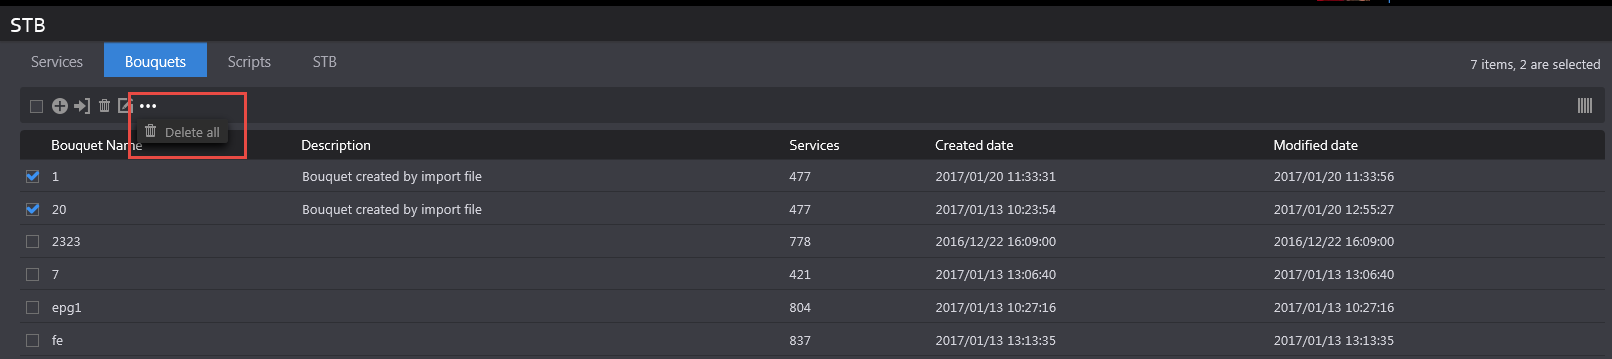
A Bouquet can be deleted one at a time or multiple bouquets can be deleted at once.
Delete a single bouquet
Hover mouse over a record and click on the Delete button.

Click on “Delete” button on the dialog box.
Deleting multiple bouquets
To delete multiple bouquets at the same time, select the bouquets and then click on the “Delete All” button on the menu.
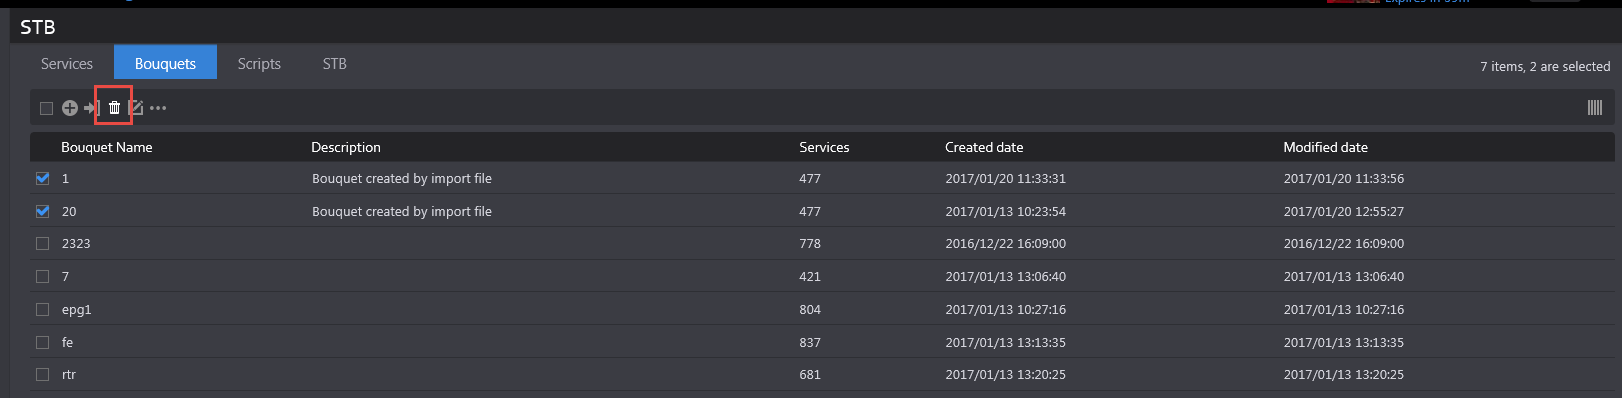
Click “Delete” button on the dialog box
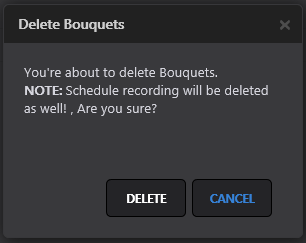
Users can also use “Delete All” option from the menu to delete all bouquets from all the pages.
Click the “Delete” button on dialog box for confirmation.
Filtering Bouquets
Go to Settings -> STB -> Bouquet tab
On Search panel at the left side of the page, enter text that you want to search
Search will be performed on the Bouquet Name field
Click on Reset button to clear the search results and restore all records on the page.
Manual Schedule Recording
This module allows users to record a channel/service during specified periods. The events or jobs created can be a onetime recording or reoccurring recordings.
Creating an event
Go to a module such as Share, Comply or Monitor and click on the “Scheduled recording” page.
Click on + (Add event) button from the top menu

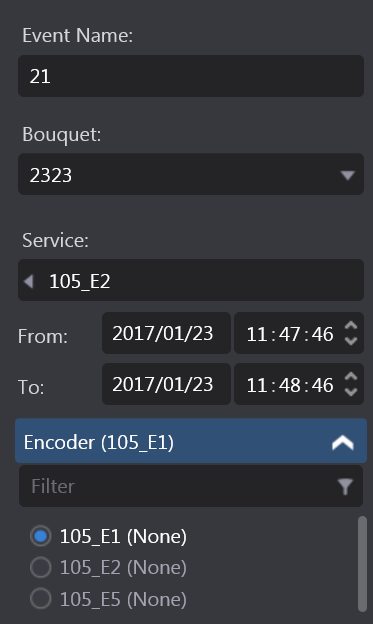
On “Add” screen, select the parameters:
Event Name – Name of the recorded event
Bouquet – Select the bouquet, which contains your service/channel
Service – Select service/channel from the loaded list
From and To – Select Start and End date/time for the program/recording
Encoder – Select the stream, which will be displayed automatically after user selects the service/bouquet (The mapping of encoder with bouquet is done by the administrator in the Configuration page)
For recording options please see below:
To record only once, do not select the checkbox
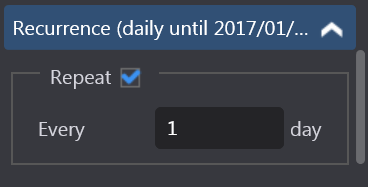
To record a channel/service on multiple days, select the Repeat checkbox
If value in textbox = 1, then recording will happen daily
If value = 2, recording will happen every 2nd day, and so on until end condition is specified for the recording
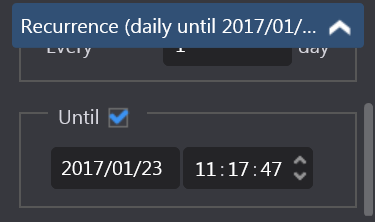
If “until” checkbox is not selected, recording will happen for an unlimited number of days.
If “until” checkbox is selected, user can specify the date/time until which job needs to record the channel.
Click on the Save button and observe that the job will be in “Scheduled” state.
Note
When user creates a Scheduled record event and it is the same time for which another event has already been scheduled, then the encoder will appear disabled and user will be unable to select the radio- button for that encoder.
The Service name will appear in the parenthesis following Encoder name indicating which channel is being recorded during that time.
Deleting event
Go to an application like Share, Comply, Monitor and click on “Scheduled recording” page.
Hover mouse on the record to be deleted and click on Delete button.

Dialog box will appear for user’s confirmation.
Click on Delete button on dialog box to delete the service or cancel button to cancel deletion.
Records can also be deleted by selecting several records and clicking on Delete All button.

Dialog box will appear for user’s confirmation.
Click on Delete button on dialog box to delete the scheduled recording events or cancel button to cancel deletion.
Filtering events
Go to an application like Share, Comply, or Monitor and click on “Scheduled recording” page.
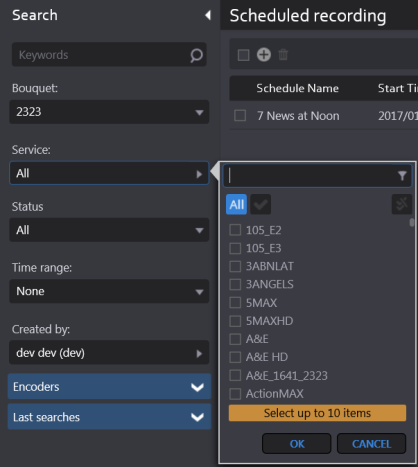
Scheduled recording events can be filtered on many parameters. They are as follows:
Keyword – Returns records which contain searched text in “Schedule Name” field
Bouquet – Select a bouquet in which search needs to be performed
Service – List of services associated with selected bouquet will be loaded. User can select up to 10 services while performing search
Status – A scheduled recording event has different statuses as follows:
Scheduled – When recording Start Time has not yet reached
Recording – When recording Start Time has reached and event is being recorded
Recorded – When event has been fully recorded
Failed – When event failed to record due various reasons
Time Range – Enables user to perform search on the recorded events based on their “Created Date”
Only those records will be returned which are created between the “From” and “To” date/time in the search criteria.
Created By – Select up to 10 users in search criteria
Encoders – Search by selected encoders
Click on Search button. Search is performed based on the criteria selected in #2
Click on Reset button to clear the search results and restore all records on the page.
Additional Capabilities
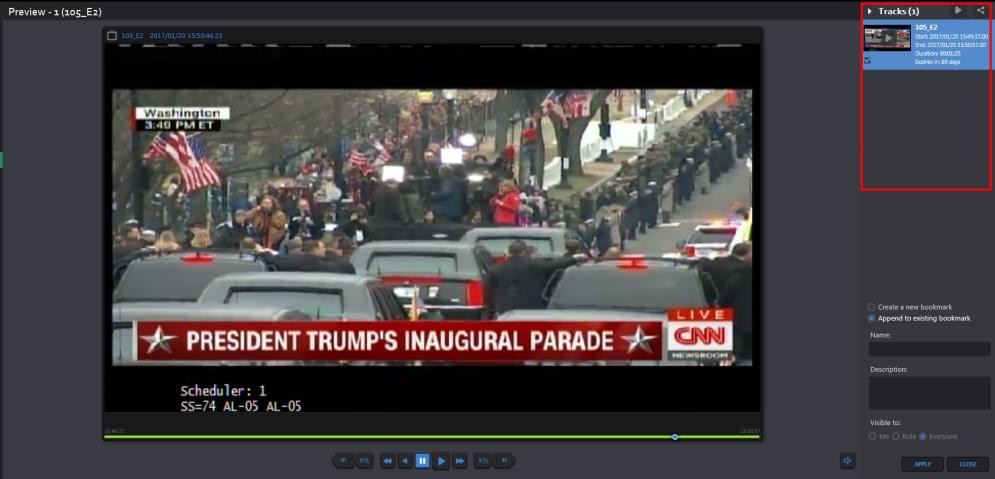
When the event status changes to “recorded”, the play button appears on the record. When user clicks on this button, player appears and user can view the clip. Along with viewing, user gets other clip capabilities like Export, Share, Edit, and Save Clip as Bookmark.
Edit button appears on the record when event is in Scheduled state or Failed state. User can change different parameters like Start/End Date/Time, name of the event etc. but if an event completes successfully, he is not provided with editing capabilities.
EPG (Electronic Program Guide)
An electronic program guide (EPG) is used with digital set-top boxes to list current and scheduled programs that are or will be available on each channel and a short summary or commentary for each program.
EPG is the electronic equivalent of a printed television program guide.
EPG Scheduled Recording is a feature of the Observer STB that creates a “TV Guide” experience where the expected future broadcast schedule is displayed. Users can then select which program from this broadcast schedule should be recorded.
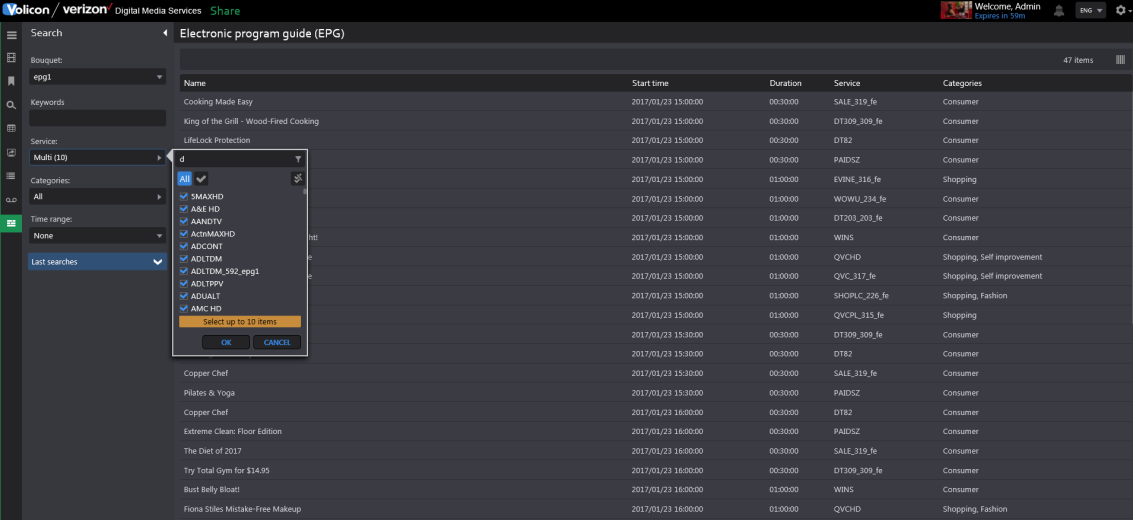
Loading the EPG
Go to an application such as Share, Comply, or Monitor and click on EPG icon.
User needs to fill up the Search form to load the page.
Bouquet – Select the bouquet from drop down
Keyword – Text matching program name
Service – Select channel auto-populated according to the bouquet it is associated with. Maximum 10 items services can be selected in this field.
Categories – Program categories
Time Range – Define a time range - Start and End Time of program
Click on Search button. A list of programs will be loaded on the page based on the search criteria
Adding Programs to Schedule Recording
Go to an application like Share, Comply, or Monitor and click on EPG icon.
Hover mouse over one of the records returned from Step 1 above.
Click on + button and program info appears as a sliding window.
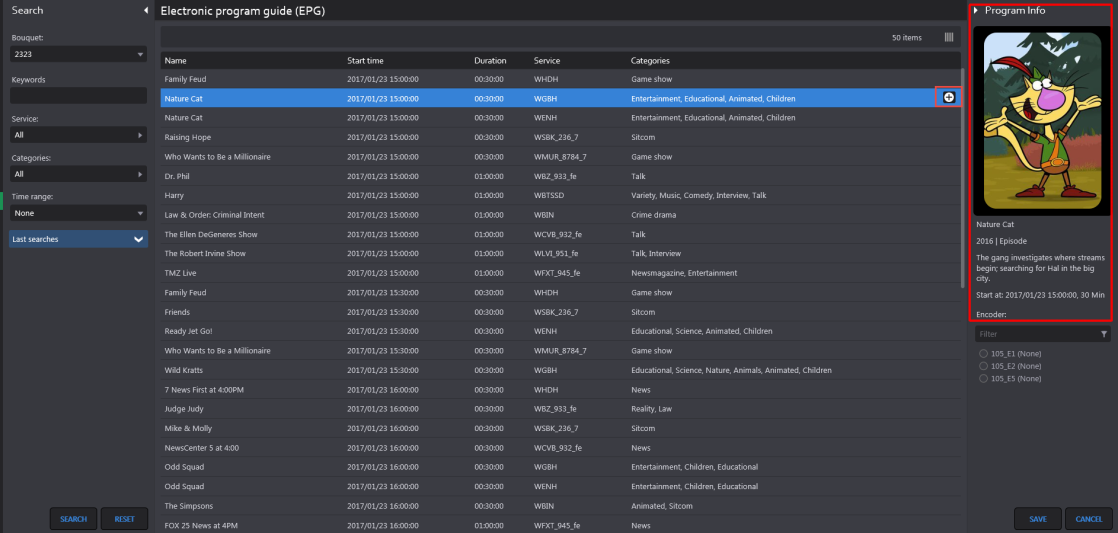
Select the encoder (associated with the bouquet) for which recording needs to be done.
Click Save. A confirmation message appears to the user and an event is created on Scheduled recording page (please reference images below)

