Trainer Tab
After running the IR trainer application, you will be presented with the IR Trainer interface. Then select the matching IR device from a list shown on top-right. On a 4-channel RPM system there will be four IR devices available. The list of checkbox commands applies to the IR device selected.
Express Mode
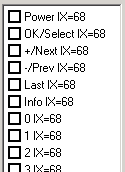
This mode saves time when programming the entire R/C key set. Start by directing a Remote Control to the IR blaster selected above and press the <Express> button. You will be prompted to press the first R/C key <Power>, press it for about 4 sec until the IR blaster LED turns off or until a confirmation code displays next to the digit being programmed. The received codes the same for the digits programmed (figure on right) help us to verify that the IR codes were programmed correctly.
If any of the keys are not successfully programmed, record the key type to revisit it later but proceed to the next key to program it using the Express Mode until all keys in the basic set are programmed.
Then to confirm that digits are working with the STB used - checkmark a digit; direct the IR blaster to the STB and press the <Transmit> button, then verify that the key affected the SRB in the expected fashion.
Regular Key Programing
To start programming the IR codes file, select the first command in the list “Power” and place remote control in front of the IR transceiver about 2-3 inches, then press the <Capture> button on IR Trainer and firmly press the <Power> button on the R/C - the UIRT LED will come on. Keep pressing the button until the UIRT LED goes off.
After releasing the button, wait 4-5 seconds. If receipt of the signal was successful, the cursor will change into an hourglass shape, and shortly afterwards, the power command will display an IX value on the IR trainer GUI.
Repeat the training process for all the entries in the list, each time pushing the appropriate buttons on the remote control.
Note that the IX values must be identical for all of the commands. If there is a different IX value for a given command, then the capture for that command was not successful. To redo the command, select it in the list, then click the <Transmit> button on the left of the IR trainer GUI. After 2-3 seconds, the Yes/No buttons below <Transmit> will activate. Click <No> and the entry in the command list will become blank. Reselect the blank entry in the command list and repeat the training process for this entry.
Training Verification
Once you have completed filling in all of the commands, you must verify that they all work with the set-top box. To do this, select the first command in the list “Power”, point the IR transceiver at a set- top box, and click the Transmit button. The transceiver will broadcast the selected command to the set-top box. After about 2-3 seconds, the <Yes>/<No> buttons below <Transmit> will activate. If the transmitted command worked, click <Yes>, otherwise click <No>. If you click <No>, the entry will be erased, allowing you to re-input the command.
Every command sent and verified will be marked with a checkmark. Repeat the process for each entry in the command list, making sure that the sent commands perform the expected function just as if you had issued them from the remote control.