Keyword alerts tab
Use this section to have MIS monitor Closed Captioning for specific words and generate a notification email. The channel dashboard works much like other MIS section to restrict the display to specific alerts.
Search
The search field works much the same as in other MIS applications. You are able to search by keyword, Alert type, time, email recipients and channel.
Alert controls
Icons at the top of the alerts page enable you to control alert notification and delete old alerts.
 Check all: select all alerts
 Create new alert: manually add an alert
 Remove selected alert: delete any checked alerts
 Enable alerts
 Disable alerts
 Customized column: check or uncheck desired columns
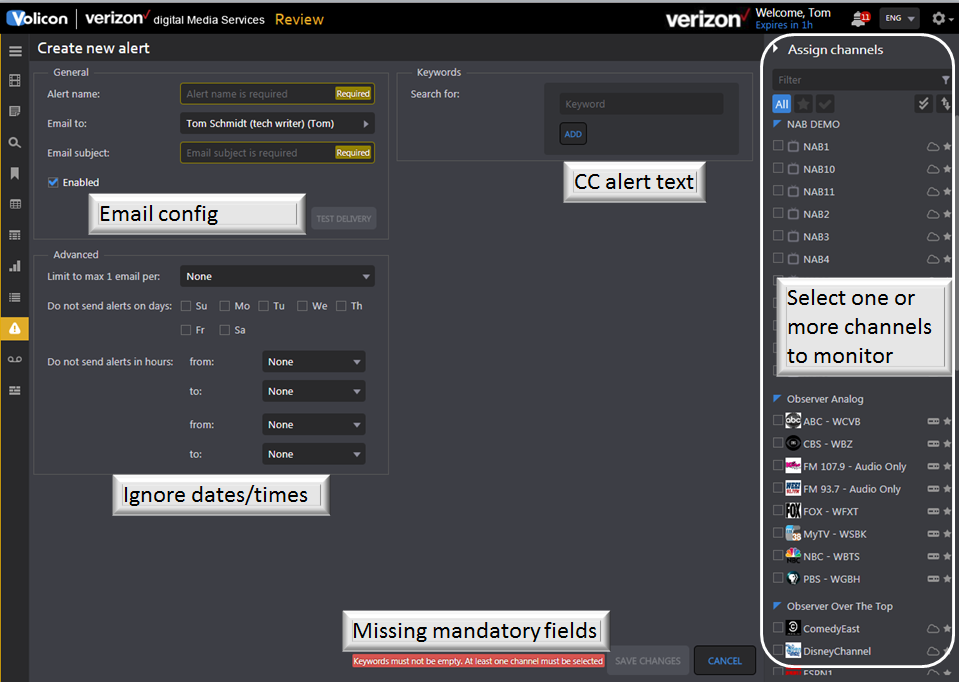
Create a keyword alert
Pressing the new alert icon  opens a new page composed of three sections.
The left hand pane allows you to set which email account(s) MIS sends the alert and define the alert name and subject line. By default the alert is sent to your email accounts. You can delete your address and add multiple other addresses. If there are multiple addresses the Email to field changes from the email name to Multi(x) indicating how many emails are selected. Opening the dropdown displays a list of email addresses.
Below that are Advanced options used to limit how often and when to send the alert.
The Keywords middle pane is used to specify keywords. Each time you enter a keyword the system automatically generates another text box to enter an additional keyword. If you enter multiple keywords MIS will generate an alert if any match the closed captioned text.
Lastly the right hand Assign channels pane allows you to select the channel or channels you want to monitor. Typing all or part of the channel name into the Filter text box at the top of the display list restricts the display to matching channels.
Press <Save changes> at the bottom of the page to add an alert. To test the alert press the <Test Deliver> icon in the left hand section.

Figure: Closed captioning alert
Editing/deleting a keyword alert
To edit or delete an Alert, hover over the alert. MIS will display the edit  icon on the right hand side of the alert. Pressing the icon opens the same page you used to create the alert, except now it is filled in. Press <Save changes> when you are finished editing the alert. Use the Trashcan icon to delete the alert.