Graphical User Interface (GUI): Initial Login
Steps to Log In
At the top of your Browser search bar, enter the IP address or URL provided by your MIP System Administrator.
You will then be prompted for your log in credentials (Username/Password). This will also be provided to you by your MIP System Administrator.
TECH TIP
Add the IP address or the MIP domain name to the “Trusted Sites” list in Internet Explorer.
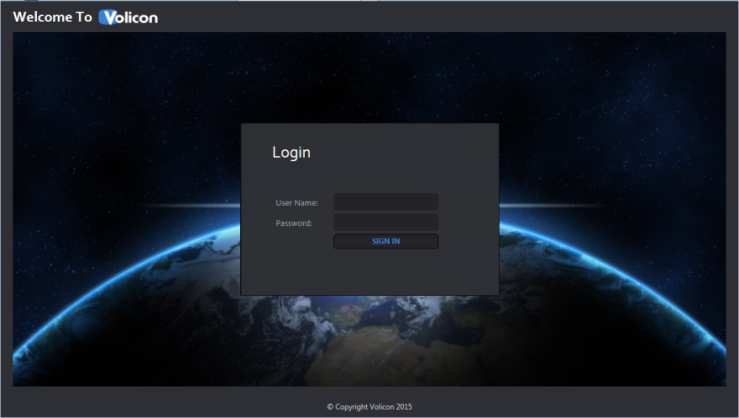
Your Initial Log in Screen
MIP greets you with a log in screen. Enter your user name and password and Press <Sign In>.
The browser asks if you want it to remember your password. If this is the computer you always use and trust, allowing the browser to remember your password is convenient. If you are not sure what to do, click on the X and the browser will ask again the next time you log in.

Figure: Browser Password Storage
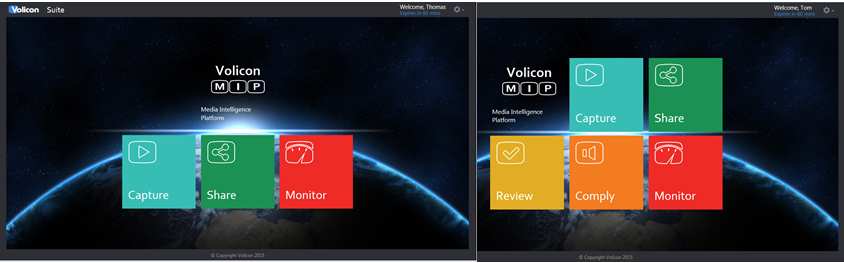
Assuming you entered your account credentials correctly you will be greeted with the MIP home page. The specific icons displayed depend on your account settings and the installed MIP options.
Logging Out
To log out, click the <Gear> icon at the upper right corner of any MIP page. The <Gear> icon appears on all pages so you don’t have to go back to the home page to log out. This opens another menu, click on <Log Out> at the bottom. MIP asks you to confirm that you really want to log out. As with the home page the specific options you will see is dependent on your account settings.
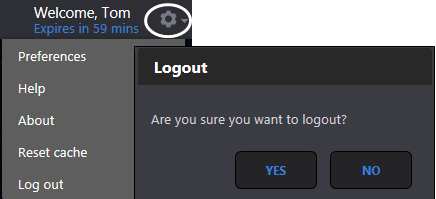
Figure: MIP Log out
MIP Internet Explorer Settings
For full functionality, the Volicon MIP currently supports Internet Explorer versions 10 and higher in 64-bit. When using Internet Explorer for the first time you must set “Compatibility mode”.
After you log into MIP left click the <Gear> symbol at the upper right of IE and then choose <Compatibility View Settings>. Note: this is the IE tools icon, not the lower tool icon for MIP.
The URL or IP address of the MIP server should automatically populate under “Add this website:” Click on <Add> to set IE to access the MIP web site in compatibility mode.
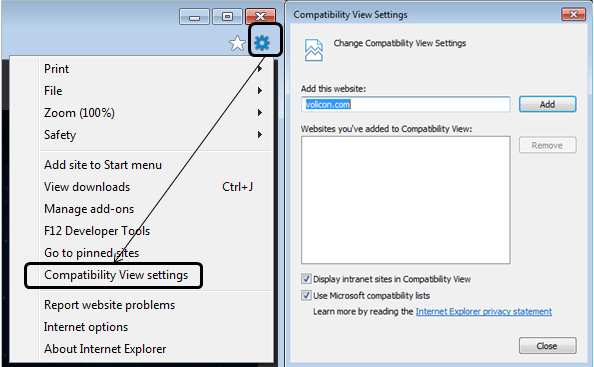
Figure: Setting IE Compatibility View
Next set the location of the MIP server as a trusted site. This allows you to restrict ActiveX (used by the Volicon player) when browsing the Internet while still allowing its use when logged into MIP.
From the same <Tool> icon used to set compatibility mode select <Internet Options>. Select the Security Tab and click on <Trusted Sites>. Then click the <Sites> button. The MIP web site URL should be showing under “Add this website to the zone:” The IE default policy to allow placing a server in trusted zone is that it must use SSL/TLS security (HTTPS). If the MIP server does not use SSL/TLS you need to uncheck the “Require server verification” check box. Press <Add> to update the trusted site list then <Close>.
To verify you successfully added MIP click <Trusted Sites> again then <Sites>. The MIP server URL should show in the <Websites:> box.
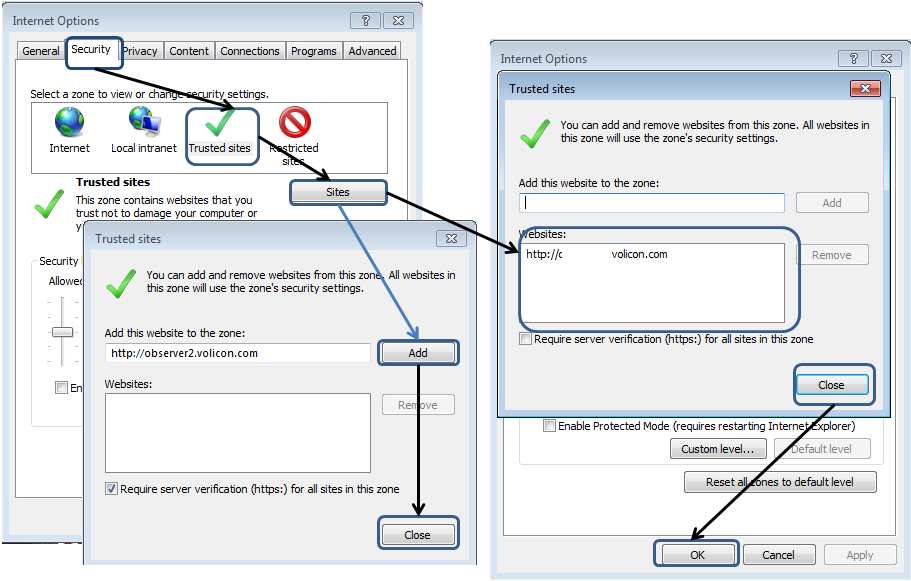
Figure: Add MIP to IE Trusted Sites
Multiple Browsers Support, Clientless Mode – Silverlight Player
The Volicon MIP supports a clientless mode for use with Chrome, Firefox, and Safari browsers. Clientless mode allows you to avoid installing the Active-X player. MIP automatically uses the Silverlight player when you use a non-IE browser. Note that the MIP offers Silverlight support for the Safari browser only when you are using Safari on the MAC OS. The MIP does not support Safari on Windows.
For more on Silverlight compatibility, visit: http://www.microsoft.com/getsilverlight/Get-Started/Install/Default.aspx
To use clientless mode, please contact Volicon support.